Focal Length, Depth of Field, and Field of View
Focal Length, Field of View and Depth of Field… These all sound very exciting. Or maybe not. Perhaps they just sound slightly frightening. They are the sort of thing that you can delve into in quite some complexity, or try to avoid as much as possible, but you need to know a little about them if you are to use your cameras to their fullest capacity.
What this page will do is give you some tools to think about questions like ‘how far to I have to stand back to fit everyone in?’ and how close can I focus with this particular camera?’
Focal Length
The focal length of a lens is the point from a certain point in the optical system to one of the principle foci (for practical purposes the image plane). In a thin lens (where the thickness is negligible compared to the focal length) this is from the centre of the lens. In a multi-element camera lens it is from the rear nodal point (which can be outside the physical structure of the lens, woooo, spooky).
Confused? You bet, and that is a gross oversimplification.
You can have a look at Wikipedia and read up on all of this if you like. But you don’t really need to know it all.
Most cameras or lenses will have the focal length printed on them. In this case you will just know it and can use it. For a simple meniscus lens (one element) you can poke about inside the camera or estimate/measure the distance from the back of the lens to the film plane (and add a millimetre or so to take account of the thickness of the lens). For more complex systems you would need a bit more information about the lens (and some mind-bendingly complex equations) to work it out, but normally these are the kind of lenses will have the information provided.
Basically the focal length dictates how strongly a lens converges light. In a simple lens it is to do with the thickness of the element, in a more complex system it is a function of all the elements together, but basically a short focal length lens bends the light rays more strongly, converging them at a close point. In photographic lenses a long focal length results in a greater magnification and a narrower field of view, and a short focal length results in a wider field of view and less magnification. This is why longer focal length lenses are known as telephoto lenses and short focal length lenses are known as wide (angle) lenses.
The focal length also affects how objects look in the frame. A short focal length lens will appear to have a greater sense of perspective, that is things that are close-up will appear larger, and things that are far away will appear smaller. So you can have a person (or anything else for that matter) fill the frame and a wide expanse of background as well. They also make people’s noses stick out. A long focal length lens is the opposite, a close up person filling the frame will have less background visible behind them.
Along with this is the depth of field, essentially the front to back sharpness. A short focal length lens will allow someone very close to be in focus, and the background a long way away to also be in focus. A long focal length lens will throw the background off focus if it is focussed on an object which is close. In general, shorter focal length lenses focus closer than longer lenses, but this is not always the case as some longer focal length lenses have modifiers allowing closer focus.
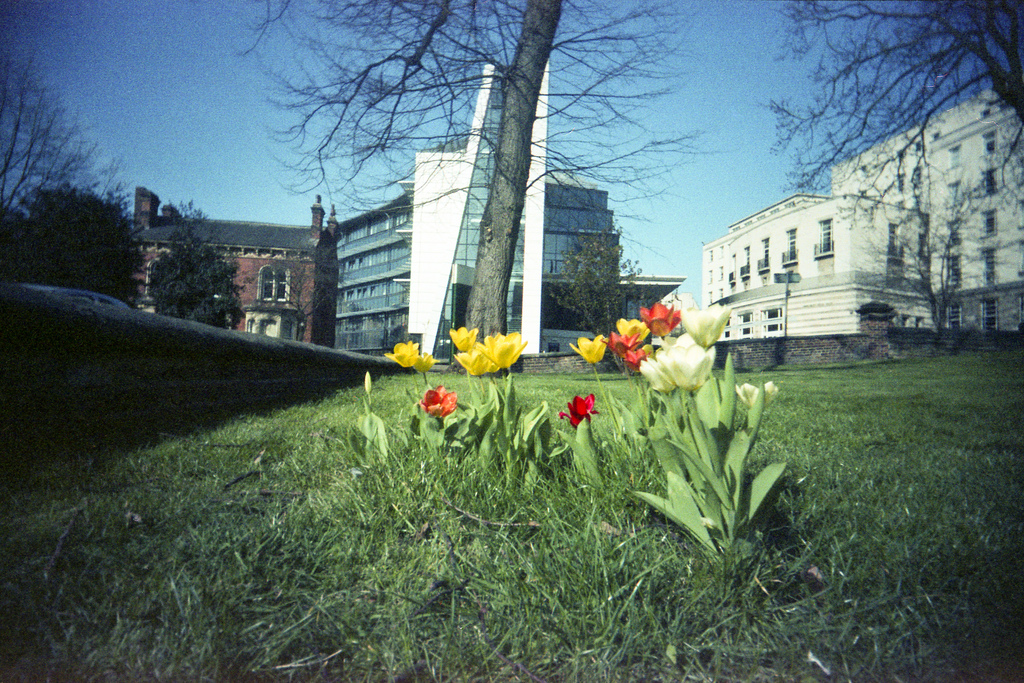
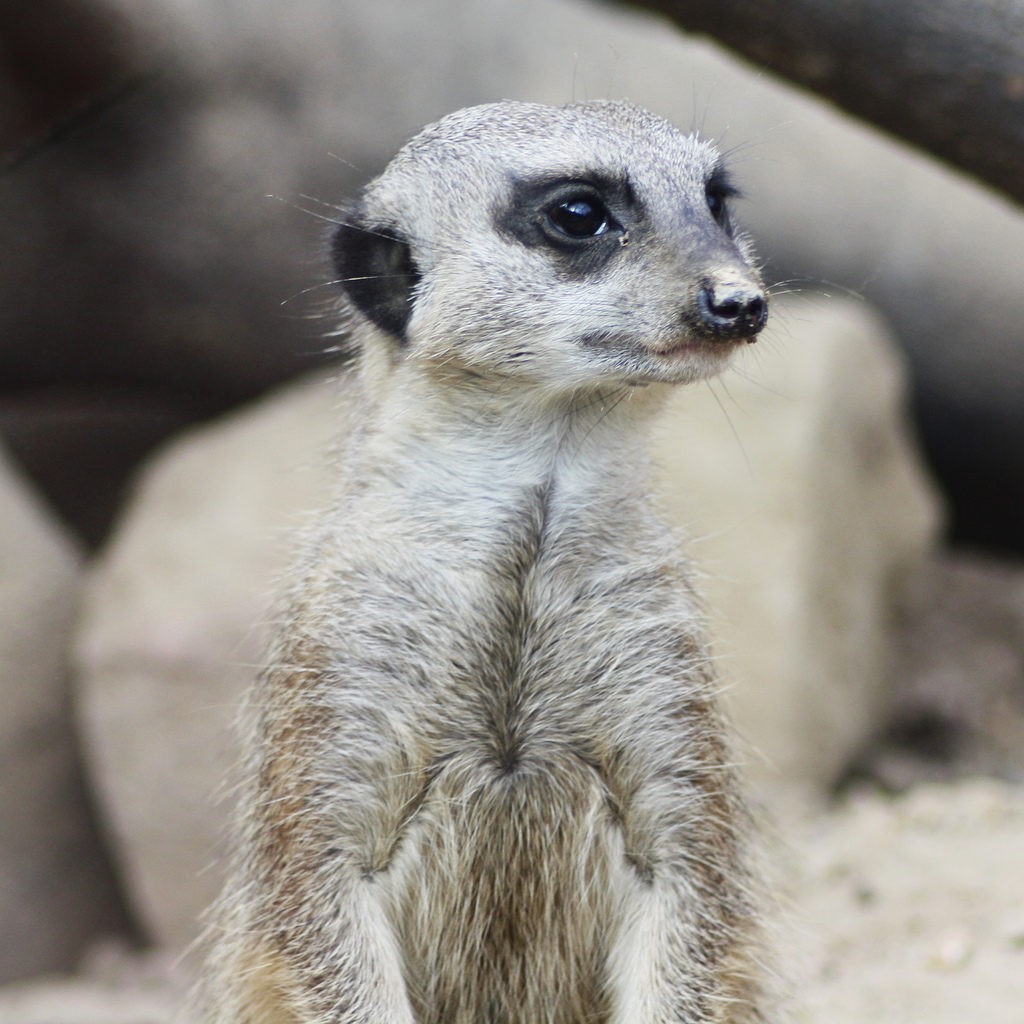
The photos above illustrate this effect. The tulips loom large in the frame, looking almost as big as the distant buildings, and the scene is sharp from front to back. I was around a foot from the flowers when I took the image. The meercat is big, but I took the image from about 12 feet away. The background is blurred, and also looks to be very close to the meercat, although it was a good 4-5 feet away. You can visualise the effect on the background by imagining a cone of light coming into the lens (which is exactly what happens) – with the shorter lens the cone is wider, showing more background.
Field of View
The field of view is basically the angle that can be seen through the lens. This depends not only on the focal length, but on the size of the image plane. The full equation is:
FOV = 2 * arctan (frame size/(focal length * 2 * (magnification+1))), where magnification ≈ focal length/(focal distance-focal length); but I only put that in to make me look clever. Frame size is the size of the film plane or sensor on the axis that you are calculating for (horizontal or vertical); because arctan is a function, so long as the measurements are all in the same units this equation will work.
Note that with a focal distance of infinity magnification must be 0 as infinity divided by (anything minus infinity) must equal zero. Infinity is clever like that and this effectively allows you to chop that part out of the equation if you are focused at infinity and use FOV = 2 * arctan (frame size/(focal length * 2). Sadly lenses in fixed focus cameras are not focussed at infinity, but actually the difference is so minimal that this simplified equation is usable unless you are going into the real macro zone with longer lenses. For example a 300mm lens focused at 30m gives the magnification of 300/(30000-300) = 0.01x¹, so you are removing a multiplication factor of 1.01 from the equation; this is an error of 1% or about 0.07° in this case.
Now I have probably rendered your brain inoperative with trigonometry I’ll let you know that you don’t really need to know all that. I use this brilliantly helpful table from Bob Atkins to calculate the field of view of lenses in my reviews, which is also where I nicked these equations from. His calculator assumes that the lens is focussed at ∞ which stands up reasonably well as I outlined above. For the purposes of my calculations for cameras it is going to be pretty solid at the minimum focus that simple lenses provide.
When you see a lens advertised, is is normally the diagonal angle of view listed, which I have never thought to be very helpful as I don’t always want to take diagonal images. I want to know how much I will fit from the top to the bottom, and from side to side. So I would need to do two calculations, one horizontal, and one vertical.
35mm film (with an image size of 36 x 24 mm) is taken to be the standard size in most calculation tables like these, and as a digital sensor is often smaller a ‘multiplier’ is applied. The smaller image plane basically increases the effective focal length of the lens as it is like cropping the centre of an image and magnifying it, which is why it is stated as a multiplier. Where the image plane is the same ratio it is easy to work out. For a canon sensor which has a size of 22.2 x 14.8 mm this multiplier is 36/22.2 = 1.6. For 6×9 medium format (60 x 90 mm) it is 36/90 = 0.4. For odd formats such as 6×7 medium format you will need to do the calculation twice, so the vertical crop factor is 24/60 = 0.4, and the horizontal crop factor is 36/70 = 0.51. Just remember to read the correct field from the table.
When calculating the 35 mm equivalent focal length of a lens (which is sometimes useful, but really often not) it is most appropriate to use the diagonal crop factor, but to work out the angle of view you do need to remember that the proportions are not always the 3:2 of 35mm film. This table gives you some common crop factors, focusing on film and some of the more obscure film cameras:
| Format | Frame size (Approx) | Horizontal Crop Factor | Vertical Crop Factor | Examples | |
| 6×12 Medium Format | 120 x 60 mm | 0.2 | 0.4 | Lomography Belair | |
| 6 x 9 Medium format | 90 x 60 mm | 0.4 | Many box or bellows cameras, for example Brownies. | ||
| – | 60 x 90 mm | Apply 0.4 and swap H and V angles. | Gevert Gevabox | ||
| 6 x 7 Medium Format | 70 x 60 mm | 0.51 | 0.4 | ||
| 6 x 6 Medium Format | 60 x 60 mm | Apply 0.4 (V) and use same angle for both H and V. | Kodak Brownie Cresta; Lomo Lubitel 2. | ||
| 6 x 4.5 Medium Format | 60 x 45 mm | 0.6 | 0.53 | ||
| 4 x 4 127 Format | 40 x 40 mm | Apply 0.6 (V) and use same angle for H and V | Kodak Brownie 127 Model 3 | ||
| 4 x 6 127 Format | 60 x 40 mm | 0.6 | Kodak Brownie 127 Model 2 | ||
| Diana 16 Shot | 42 x 42 mm | Apply 0.57 (V) and use same angle for H and V | Diana; Diana F+ | ||
| 126 Format | 28 x 28 mm | Apply 0.86 (V) and use same angle for H and V | Kodak Instamatic 33; Agfamatic Sensor 200 | ||
| Diana Mini Square | 24 x 24 mm | Apply 1 (V) and use same angle for H and V | Diana Mini | ||
| Half Frame | 17 x 24mm | 2.1 | 1 | Diana Mini; Golden Half | |
| APS-C (Nikon) | 23.6 x 15.7 | 1.52 (normally quoted 1.5) | Nikon DSLRs | ||
| APS-C (Canon) | 22.2 x 14.8 mm | 1.62 (normally quoted 1.6) | Canon EOS 1000D; Canon 60D | ||
| 110 Format | 17 x 13 mm | 2.1 | 1.8 | Prinzmatic Deluxe 110 | |
| Quarter Frame Strip | 8 x 24 mm | 4.5 | 1 | Supersampler | |
| Quarter Frame | 17.5 x 11.5 | 2.1 | Action Sampler, Vastframe Action4; Sirius Action Tracker | ||
| 1/1.6” | 8 x 6 mm | 4.5 | 4 | Fujifilm A800 | |
When I am reviewing cameras I provide a (rough) figure for how far away you need to be to shoot an ‘environmental portrait’ or a street shot – by this I mean fitting a full length shot of a person in the vertical frame (with the camera held horizontally) as you would if taking a picture of someone in their surroundings. I use 7 foot as my figure for the height for this. This table provides some examples of the field of view for common focal lengths (for 35mm film).
| Focal Length | Horizontal | Vertical | Distance for full length portrait | Examples |
| 22mm | 79° | 57° | 7ft | Vivitar UWS; Long axis of Supersampler |
| 27mm | 67° | 48° | 8ft | Olympus Trip Compacts |
| 28mm | 66° | 46° | 9ft | Standard Wide Film SLR Lens |
| 32mm | 59° | 41° | 10ft | Canon Sureshot Sleek |
| 35mm | 55° | 38° | 11ft | Most 35mm compacts; ‘Normal View’ (1) |
| 40mm | 49° | 33° | 12ft | Smena 8M; Agfa Optima |
| 50mm | 40° | 27° | 15ft | Standard SLR fast prime lens |
| 58mm | 35° | 23° | 17ft | Helios 44/2 lens |
| 70mm | 29° | 20° | 21ft | Short end of Common M42 Zooms |
| 135mm | 15° | 10° | 40ft | Common M42 telephoto prime |
| 210mm | 10° | 7° | 62ft | Long end of Common M42 Zooms |
| 300mm | 7° | 5° | 90ft | Common long telephoto lens |
| 1200mm | 1.7° | 1° | 350ft | Longest Canon Lens |
| 1700mm | 1.2° | 0.8° | 500ft | Longest Nikon Lens |
| (1) 35mm is said (Harper 2002²) to represent the ‘normal’ human perspective, though 50mm is also often cited. The human visual system has an effective field of view of almost 180° which is not possible with a rectilinear lens. I think 35mm is just a field of view we are used to seeing in modern vernacular photography. | ||||
Where this breaks down is for fish-eye lenses. A fish-eye lens can have a field of view of 180° (or even more, yes some can see behind you), which a rectilinear lens cannot. I’ll leave Bob Atkins to explain those as in general they are a bit too complex and uncertain for what I am doing here, though I used the equations when needed.
Depth of Field
I mentioned earlier that a longer focal length affects how the foreground and background are separated, and the way that longer lenses will tend to blur the background in an image more than shorter focal lengths.
As well as focal length, this is a function of aperture. Aperture is in most basic terms the size of the opening, or entrance pupil of the optical system. Basically at some point in the construction of the lens an opening restricts the size of the light transmission path. What is slightly spooky is that the size is not the actual size of the opening, it is the size of the image of the opening as it is seen through the front of the lens.
Aperture is measured relative the to focal length of the lens, with the equation N = f/EN, where N is the aperture value, f is the focal length and EN is the diameter of the pupil. Thus for a focal length of 30mm an aperture with a value of 4 would have a diameter of 7.5mm as 4=30/7.5. As the aperture number is a function of the focal length this value of 2 is expressed as f/2. Because it is each doubling of the area that will allow double the amount of light to pass, a multiplication of about 1.41 in diameter will produce this doubling of area. So the aperture scale goes 1, 1.4, 2, 2.8, 4, 5.6, 8 and so on. What all this means is that if you know the focal length of a lens you can measure the opening and work out the aperture value. Or vice versa. And you can make reasonable job of this due to the fact it is the image of the opening on the front element; you don’t have to open up the lens if it is hidden inside.
You may be wondering the use of this.
These numbers crop up in lens specifications, and camera settings. The numbers allow the calculation of exposure through some simple and quite nifty sums, and depth of field through some slightly more complex sums. Here I am concentrating on depth of field. Simply, a wider aperture (lower f/stop) will have a shallower depth of field and vice versa.
Depth of field is the distance between the nearest and furthest objects in an image that are acceptably sharp. Calculating depth of field is ridiculously complex. The equations are here if you want them. But by doing so you can work out what will be in focus for a particular lens, which is useful if you are using a ‘guess the distance’ camera and want to know your margin of error. For thinking about how close you can shoot with a simple camera there is a simple way out, which is the concept of hyperfocal distance.
The hyperfocal distance can have two definitions, but the most useful is a focal distance that is the closest you can focus and still have infinity in focus. In fact, when focused at the hyperfocal distance everything from half the hyperfocal distance to infinity will be in focus. So, if a simple camera (with no focussing controls) says that the closest you can shoot is 5ft, this normally means that it will be focussed at 10ft, and 10ft is the hyperfocal distance.
For a simple camera, it makes sense to have the the greatest depth of field that can be provided, and also that infinity is in focus. So this means that the lens is focused at the hyperfocal distance. This is not always the case, but it is a good rule of thumb.
The equation is H=(f²/(N*c))+f where f is the focal length, N is the f number and c is the circle of confusion. The circle of confusion is the largest acceptable size that a spot point can be magnified to in the image, and depends on enlargement size, visual acuity and how far away you will be looking at the image from. A figure of 0.03mm is normally used.
Fortunately, again there is a nice site to do all this for you. DOFMaster has an online calculator, and apps for the iPhone. There are various other apps floating about for android and other systems.
To illustrate this, I will provide a couple of examples.
1) You have found a little point and shoot camera. It says it has a 34mm lens. You want to know how close you can use it, and whether it will take a full length portrait in your living room. You measure the image of the pupil by looking at the lens; it is about 6mm. 34/6=5.66, so lets use the fairly standard aperture value of f/5.6. Putting these values into DOFmaster gives you a hyperfocal distance of 22.5ft. Assuming the lens is focused at the hyperfocal distance everything from 11.3ft onwards will be in focus. You then turn to Bob Atkins (other field of view sites are available) and enter 34mm. Change the subject distance by trial and error until you get a figure of about 7ft for the field of view in units. I got 10ft to fit it in with the camera in landscape orientation. So, if your living room is reasonably big you can do it. Of course the more astute among you will notice this will not be as sharp as it could – most simple lenses have relatively small apertures for this reason.
2) You are out street shooting and don’t want to keep focusing. It is quite dim so you have needed to use an aperture of f/4 to get the exposure you need, but are worried that this wide aperture might not have the best depth of field. Your lens is 40mm, and has guess the distance focussing. The hyperfocal distance for this lens is 44ft, so to get the best depth of field you focus to this distance and everything from 22ft onwards is in focus. But stepping back 22ft gives you a horizontal field of view of 13ft, and you are not taking shots of two people with one standing on the other’s shoulders… Being about 13 foot away gives you a nice field of view of 7.8ft, just enough to get a person in their surroundings, in landscape format. So back to DOFmaster. Setting your focus at about 12ft gives you acceptable focus from about 9ft to 17ft. Tight, but you know what it is. And it will blur the background nicely. If you want a sharper background you will need to stick in some higher ISO film, and make the aperture smaller.
Of course, you could go all lomo baby and not think about what you are shooting. But where’s the fun (and geek points) in that. Hopefully this will give you some ideas to use any old cameras you find floating about to their full potential.
Notes and References
1) Just for reference. the magnification is the amount the object is magnified on the film plane, not how much bigger is looks in the viewfinder, so in this example a 2m tall person would be 20mm on the negative.
2) Harper, D (2002) ‘Talking about pictures: a case for photo-elicitation’. Visual Studies, 17(1) 14-26.
1 thought on “Focal Length, Depth of Field, and Field of View”